ICT Order Blocks — How to Find, Validate, and Trade Them
Order Blocks are the institutional footprint on your chart — the exact zones where banks placed their orders. This deep guide covers every type of Order Block, validation criteria, and precision entry methods.
Framework note: ICT terms are interpretations of price action, not proof of institutional motives or a market algorithm’s intent. No setup is guaranteed. Test clearly defined rules, account for costs and slippage, and use risk limits before risking capital. Read our editorial policy.
An Order Block is commonly defined in ICT education as an opposing candle or area before a displacement move. The pattern does not identify who traded there or prove that unfilled institutional orders remain; price may react, pass through or never revisit the zone.
Why Order Blocks Work — The Institutional Logic
Large institutions — banks, hedge funds, central banks — cannot enter positions the way retail traders do. A retail trader with a $10,000 account can buy at market and their order is filled instantly without impacting price. A bank with a $10 billion position cannot do this — the act of entering would move price significantly against them before they have fully built their position.
To solve this problem, institutions accumulate positions across a range of prices over time, often disguising their activity within normal-looking consolidation. The final candle of this accumulation phase — before they commit fully to the directional move — is the Order Block. It contains their highest concentration of unfilled orders. When price returns to this zone, those orders are activated again, creating the strong reaction that ICT traders trade.
How to Identify a Valid Order Block
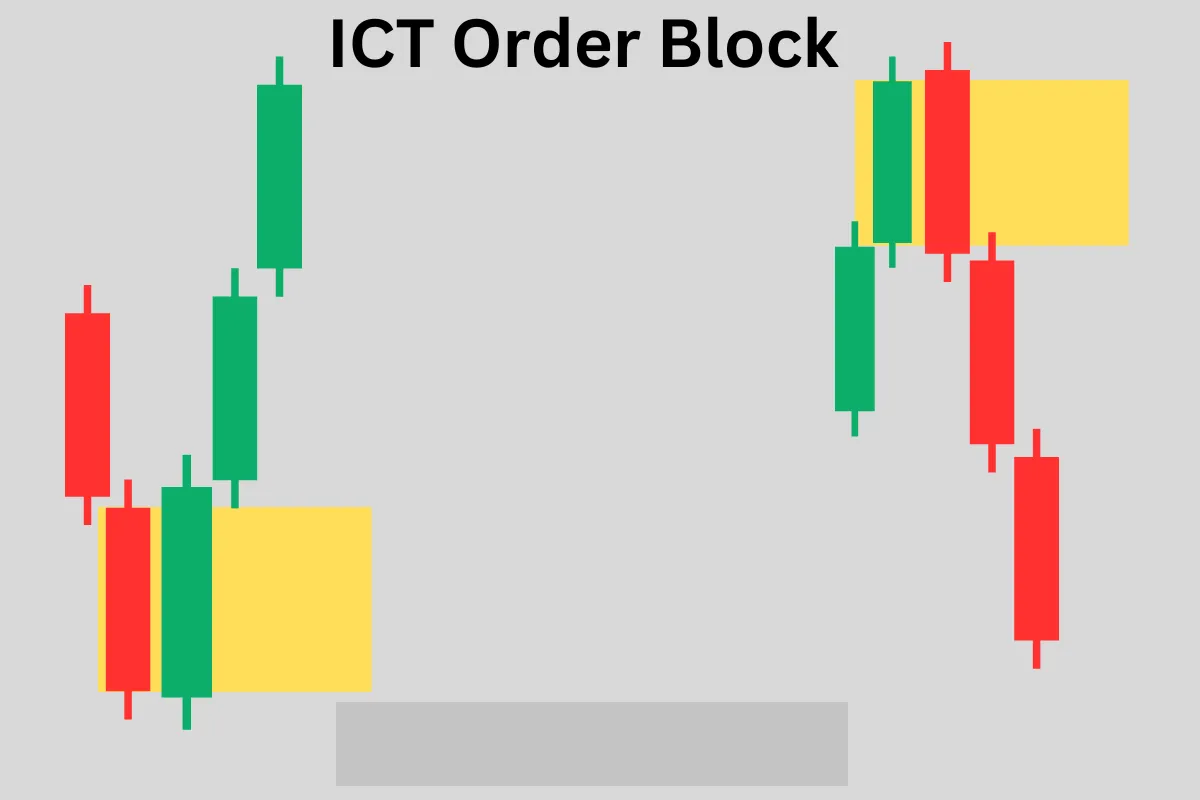
A Bullish Order Block is the last bearish (down-close) candle before a significant bullish displacement move. It represents where institutional buying occurred despite price closing lower — a deliberate accumulation of long positions before the upward move was initiated. When price retraces back into this candle's range, institutional buy orders are triggered again.
A Bearish Order Block is the last bullish (up-close) candle before a significant bearish displacement. Institutions sold aggressively into the final bullish candle before driving price down. The return to this zone activates remaining sell orders at those elevated prices.
- Criterion 1: There must be a significant displacement move immediately following the OB candle — large-bodied candles with FVGs embedded within them
- Criterion 2: The displacement must create a Break of Structure on the appropriate timeframe — confirming institutional commitment to the new direction
- Criterion 3: The OB should not have been previously mitigated — if price has already returned and fully traded through the zone, the OB is consumed
- Criterion 4: The OB must align with your HTF bias — a bullish OB during bearish institutional order flow is low probability
- Criterion 5: The strongest OBs are accompanied by liquidity sweeps — the OB forms after a stop hunt that collected liquidity for the displacement
Order Block Hierarchy — Not All OBs Are Equal
Breaker Blocks are failed Order Blocks that have been violated. When price trades completely through an Order Block — suggesting the original institutional orders have been fully consumed — the OB becomes a Breaker Block and inverts its polarity. A Bullish OB that is completely broken becomes a Bearish Breaker Block, acting as resistance on future returns. Breaker Blocks are actually considered higher quality than standard OBs in the PD Array hierarchy because the inversion creates even stronger institutional interest.
Mitigation Blocks occur when an OB is partially returned to but not fully traded through. Price touches the zone, partially fills the institutional orders there, then moves away again. On a subsequent return, the remaining unfilled portion of the institutional order is triggered. Mitigation Blocks represent zones where institutions still have open business — price must return to complete the mitigation before moving to the next target.
The Propulsion Block — ICT 2024 Update
The Propulsion Block is a newer concept introduced in ICT's 2024 mentorship. It describes a specific type of Order Block that forms at the initiation of a major trend move, typically at a significant liquidity level. The Propulsion Block is characterized by a gap between the OB and the displacement that follows — the gap represents the institutional commitment to price delivery in the new direction. These are among the strongest entry zones in the entire framework.
Entering at an Order Block — Precision Execution
Amateur traders place a limit order at the top of the Order Block and wait. Professional ICT traders do something more nuanced — they wait for price to enter the OB range and then watch the lower timeframe for signs of institutional activation. A 1-minute or 5-minute displacement move away from the OB interior is the confirmation that institutional orders are being triggered and the reversal has begun.
Stop loss placement on OB trades is placed below the entire Order Block candle — not at the midpoint, not inside the candle. The entire candle body represents the institutional accumulation zone. If price trades fully through it, the setup is invalidated and you want to be stopped out cleanly.
The single biggest mistake Order Block traders make: drawing boxes around any consolidation zone and calling it an OB. A genuine Order Block requires a displacement move immediately following it, a BOS, and alignment with institutional order flow. Without these, you are just drawing random boxes.
Worked hypothetical example: document an order-block candidate
Imagine a trader predefines a bullish candidate as the final bearish candle before a move that closes above a named swing high by at least a fixed range threshold. The candidate spans 4120–4124. Before any retest, the trader records those boundaries, an invalidation price and the maximum holding time. If price later trades through 4120, the recorded setup is a failure under that rule—even if another candle could be selected after the fact.
Failure case and what to test
Different definitions of the 'last opposing candle', swing selection and displacement can create different zones. A zone can fail, be skipped or never be revisited. Compare one precise definition at a time, and do not infer that a bank's orders remain inside a chart box.
Test checklist
- State the candle-selection, swing-break and displacement thresholds.
- Freeze boundaries and invalidation before the first retest.
- Include failed breaks, full trade-throughs and no-retest cases.
- Record risk per trade, costs and performance by instrument and session.
RELATED READING
Continue with guides selected for overlapping concepts and practical context.