ICT Quasimodo (QML): Swing Structure and Reversal Hypotheses
Learn how traders label the Quasimodo pattern from swing structure, specify the relevant break and confirmation, and evaluate follow-through without assuming a swing extreme predicts a reversal.
Framework note: ICT terms are interpretations of price action, not proof of institutional motives or a market algorithm’s intent. No setup is guaranteed. Test clearly defined rules, account for costs and slippage, and use risk limits before risking capital. Read our editorial policy.
The Quasimodo (QML) label describes a selected swing sequence that some traders use to look for a reversal. Its presence does not prove that a trend has overextended, that a final liquidity pool was swept or that the next move will reverse.
What Does the QML Pattern Look Like?
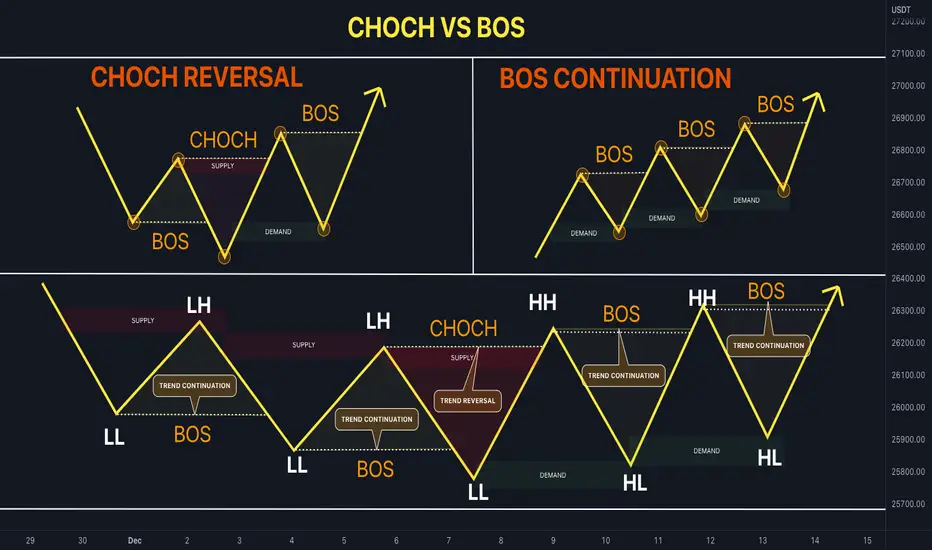
A bearish QML forms during an uptrend and consists of four swing points. The sequence: a Higher High (HH), followed by a Higher Low (HL), followed by a new Higher High that is higher than the first HH — and then the critical component: a Lower Low that breaks below the HL between the two Higher Highs. This lower low is the structural failure that signals the trend has exhausted. The pattern looks like a person with one shoulder higher than the other — the Quasimodo shape.
A bullish QML is the mirror during a downtrend: Lower Low, Higher Low (partial reversal), new Lower Low below the first LL, then a Higher High that breaks above the lower high between the two Lower Lows. This structural failure confirms the downtrend has exhausted its final push.
The ICT Logic Behind the QML
A second extreme may exceed a prior swing, but the chart does not show that all stops or pending orders at that level were collected. Define the swing break and subsequent structural confirmation before testing whether the pattern adds value.
The entry zone in the QML is the last Higher Low (for bearish QML) or the last Lower High (for bullish QML) — the intermediate swing between the two extremes. When price returns to that level after the structural failure, it is entering the zone where early smart money positioned before the final sweep. This zone acts as resistance (bearish QML) or support (bullish QML) on the retest.
Trading the QML — Entry Model
- Identify the four-swing sequence on your chart: HH → HL → higher HH → LL that breaks the HL (for bearish QML).
- Once the LL forms and closes below the HL, the QML pattern is confirmed.
- Mark the HL level — this is your entry zone on the retest.
- Wait for price to retrace back up to the HL zone. On the 5-minute chart, watch for a bearish reaction — a displacement away from the zone or a bearish FVG forming within it.
- Enter short at the HL level (or the CE of any FVG that forms within it). Stop: above the second Higher High (the sweep candle high). Target: the lowest swing low below, or the next SSL level.
- For bullish QML: enter long at the last Lower High zone on the retest. Stop: below the second Lower Low. Target: the highest swing high above or nearest BSL.
QML vs Head and Shoulders — The Key Difference
Retail traders will recognize the QML as similar to a Head and Shoulders pattern. The difference is the ICT interpretation of what is actually happening. In traditional technical analysis, Head and Shoulders is just a pattern to be followed. In ICT, the QML reveals the liquidity mechanism: the second shoulder (the higher HH) is an engineered sweep of the prior high, specifically designed to trap breakout buyers before the reversal. The HL breakdown is the confirmation that the sweep was manipulation, not genuine continuation.
QML setups are commonly studied on the 1-hour and 4-hour charts during Killzone periods. A bearish QML on the 4-hour chart that forms during the New York session open, with the entry zone aligning with a 4-hour Order Block, is an potential reversal setup. The structural clarity of the QML makes it one of the easier ICT patterns to identify in hindsight — the challenge is identifying it in real-time as the fourth swing is forming.
Worked hypothetical example
A trader marks a lower low, a rebound swing and a later lower high under a written QML pattern definition. The proposed neckline and invalidation point are recorded before the next candles form. Price breaks the neckline but immediately reclaims it, so the failed signal stays in the sample.
Failure case and what to test
The pattern can be redrawn retrospectively by shifting swing points or choosing whichever neckline best fits the later reversal. The structure does not establish why price turned or guarantee a follow-through.
Test checklist
- Write the swing sequence and neckline rule in advance.
- Track failures, retests and trades that never trigger.
- Compare QML results with ordinary swing-break rules.
RELATED READING
Continue with guides selected for overlapping concepts and practical context.