ICT PD Array Matrix: Comparing Common Price Reference Zones
Review common ICT price-reference labels and how some traders organize them with range context, then define objective entry and invalidation rules without assuming a ranked edge.
Framework note: ICT terms are interpretations of price action, not proof of institutional motives or a market algorithm’s intent. No setup is guaranteed. Test clearly defined rules, account for costs and slippage, and use risk limits before risking capital. Read our editorial policy.
The PD Array Matrix is an ICT organizing framework that groups commonly named price-reference zones. It does not establish a validated probability ranking or specify a universal best entry. Define the zone boundaries and evaluate each type against a comparison baseline.
What Is a PD Array?
A PD Array (Premium and Discount Array) is a price reference zone that some ICT traders expect could attract a reaction; this does not establish that an algorithm is programmed to respond. These are not arbitrary support/resistance levels drawn by retail traders — they are specific structural elements that represent areas of institutional order placement, price imbalance, or algorithmic programming. When price enters a PD Array in the correct context, a reaction is expected.
The PD Array Hierarchy — Ranked
ICT ranks PD Arrays from highest to lowest probability. The higher elements on this list are more likely to produce a reaction when reached in the correct context:
- 1. Optimal Trade Entry (OTE) — The 62-79% Fibonacci retracement of a completed swing. Some traders combine this location with other context, but the retracement alone does not establish an edge.
- 2. Fair Value Gap (FVG) — A three-candle price imbalance. Particularly the first FVG in a displacement sequence.
- 3. Volume Imbalance — A price range where volume from buyers and sellers is heavily skewed in one direction.
- 4. Order Block (OB) — The last opposing candle before a significant impulse move.
- 5. Breaker Block — A failed Order Block that has flipped polarity.
- 6. Mitigation Block — A failed Order Block awaiting its first retest.
- 7. Rejection Block — A candle with a long wick showing rejection at a specific price level.
- 8. Balanced Price Range (BPR) — The overlap zone between a bullish and bearish FVG.
- 9. Void — A large gap in price with no trading activity.
- 10. Propulsion Block — A 2024 concept representing a specific candle sequence that propels price in one direction.
Premium vs Discount — The Filter
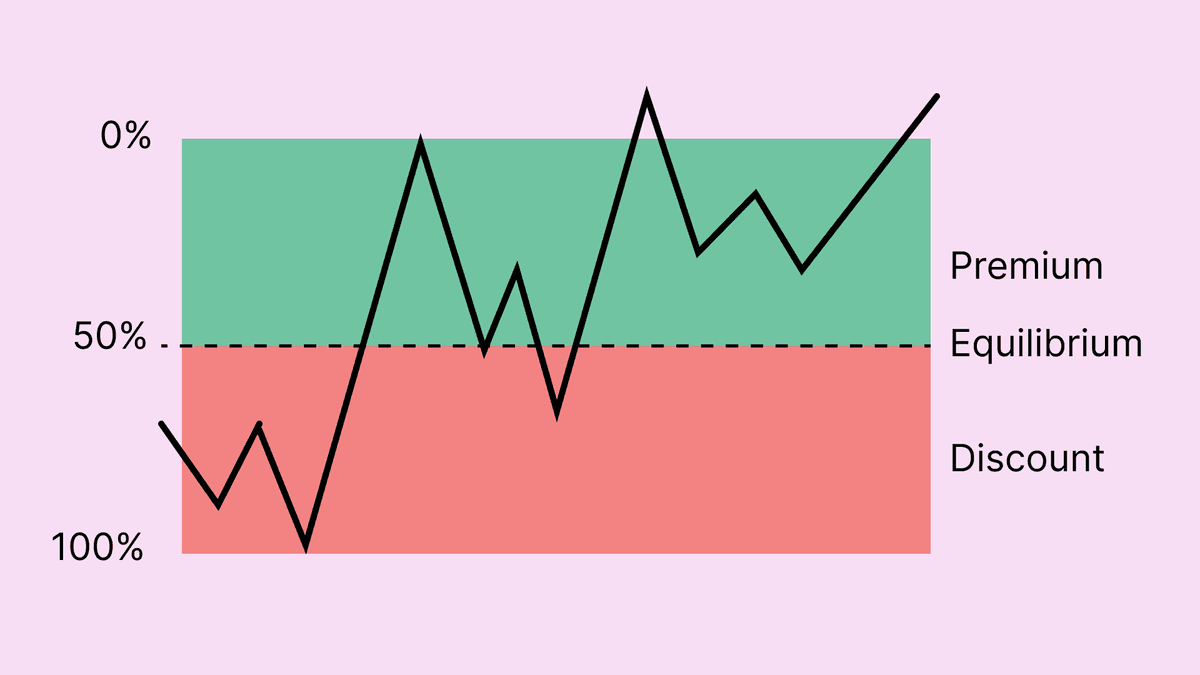
The PD Array hierarchy alone is not sufficient for trade selection. Every PD Array must be evaluated in the context of premium and discount pricing. You only buy PD Arrays in discount (below the 50% equilibrium of the current range). You only sell PD Arrays in premium (above the 50% equilibrium of the current range).
The logic is simple but powerful: buying in premium means you are buying at expensive prices — the institutional sellers will be at those levels. Buying in discount means you are buying at cheap prices — the institutional buyers will be at those levels. Aligning your PD Array entries with the premium/discount framework filters out a majority of low-probability setups.
How to Use the PD Array Matrix in Practice
Before any trade, build the matrix for your current daily range. Draw the range from the most recent significant swing low to swing high. Mark the 50% equilibrium. Mark the OTE zone (62-79%) in discount. Then identify which PD Array elements exist within the OTE zone. If an Order Block and an FVG both sit within the 62-79% zone, you have a high-confluence entry zone.
On a lower timeframe (5-minute or 15-minute), wait for price to deliver into that zone during a Killzone. Watch for the lower timeframe reaction — a displacement away from the zone, an MSS (Market Structure Shift) on the entry timeframe, or a lower timeframe FVG forming in the direction of the trade. This LTF confirmation inside the HTF PD Array zone is the complete ICT entry model.
The BPR — The commonly discussed PD Array
The Balanced Price Range deserves special attention. It forms when a bullish FVG and a bearish FVG overlap — meaning both types of institutional imbalance are stacked at the same price level. Reactions at BPRs are typically the sharpest and fastest of any PD Array element. When a BPR aligns with the OTE zone during a Killzone, it represents maximum confluence — the confluence-based ICT entry scenario.
Use the PD Array Matrix as a pre-session planning tool, not a real-time indicator. Before each session, identify the relevant range, mark all PD Arrays within the discount or premium zones depending on your bias, and then wait for price to come to you. Reactive trading — chasing price — is the opposite of what the PD Array Matrix is designed for.
Worked hypothetical example: compare two PD-array rules
In a hypothetical sample, a trader records every predefined FVG and order-block candidate inside the same higher-timeframe range. One group uses the FVG as the entry zone; the other uses the order-block zone, while all other entry, stop and target conditions remain fixed. The resulting comparison tests two written rules; it does not establish a universal ranking of arrays.
Failure case and what to test
Different anchors, overlapping zones and hindsight selection can produce apparently perfect confluence. Test each array separately before combining them, include cases in which zones conflict, and avoid ranking tools by a handful of attractive charts.
Test checklist
- Define each array's boundaries and eligibility criteria.
- Keep position sizing and outcome horizon consistent across groups.
- Record conflicting zones, missing setups and failed reactions.
- Compare out-of-sample outcomes, sample size and costs before drawing conclusions.
RELATED READING
Continue with guides selected for overlapping concepts and practical context.