ICT Market Maker Buy Model (MMBM) — The Complete Framework
The Market Maker Buy Model is ICT's complete blueprint for bullish institutional delivery. It maps the full cycle from accumulation through manipulation to distribution — giving you a macro template for every bullish move.
Framework note: ICT terms are interpretations of price action, not proof of institutional motives or a market algorithm’s intent. No setup is guaranteed. Test clearly defined rules, account for costs and slippage, and use risk limits before risking capital. Read our editorial policy.
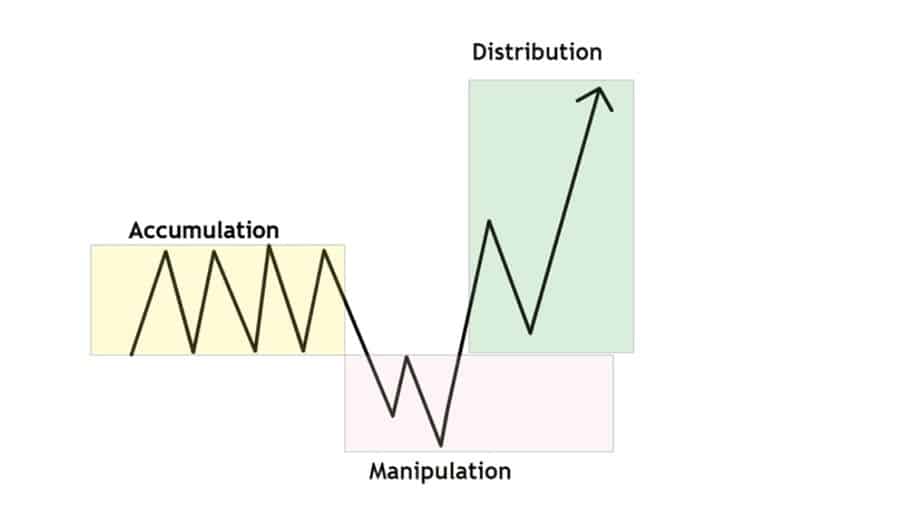
The ICT Market Maker Buy Model (MMBM) is a comprehensive framework that describes the full lifecycle of a bullish institutional delivery — from the initial accumulation phase through the manipulation phase to the final distribution. It is essentially the AMD (Accumulation, Manipulation, Distribution) model expanded into a detailed map of exactly how price behaves during each phase of a bullish market maker cycle. Understanding the MMBM gives you the ability to identify where you are within any bullish move and what comes next.
The Six Phases of the MMBM
Phase One — Sell-Side Liquidity Accumulation: The market maker (institutional algorithm) needs to build a large long position. To do so at the best possible prices, it first needs to generate selling — panic or stop-hunt selling that allows the algorithm to buy at low prices. Price is pushed down to take out stop losses and trigger sell-entry orders at previous lows.
Phase Two — Accumulation Range: After the SSL sweep, price consolidates. This is the quiet accumulation phase — the market maker is building its long position at the low prices generated by the SSL sweep. Range is tight; retail traders see this as boring consolidation and disengage.
Phase Three — Manipulation (Judas Swing): Before the true bullish move, a bearish manipulation spike occurs — price drops briefly below the accumulation range, triggering the stop losses of early long traders who entered during the accumulation phase. This sweep of the accumulation range low provides additional cheap buying opportunities for the market maker.
Phase Four — Reversal and MSS: After the manipulation spike, a sharp bullish reversal occurs. This reversal creates the Market Structure Shift on the lower timeframe — the first confirmation that the market maker has finished accumulating and is now distributing. The FVG created by the reversal displacement is the trade entry.
Phase Five — Bullish Distribution: Price is delivered aggressively higher toward the target (the BSL above). The LRLR (Low Resistance Liquidity Run) is underway. Any retracements during this phase are shallow and quickly reversed.
Phase Six — Target Reached and Position Offloading: Price reaches the BSL target (the buy-side liquidity above), the market maker offloads its long position into the buying frenzy of breakout traders, and the cycle begins again — either a new MMBM or a Market Maker Sell Model (MMSM) in the other direction.
Trading the MMBM
The confluence-based MMBM entries come at Phase Three to Four — the manipulation spike and the subsequent reversal. After the Judas Swing sweep of the accumulation range, watch for the bullish MSS on the 5-minute chart. Enter at the FVG created by the MSS displacement. Stop below the Judas Swing low. Target: the BSL above.
The second-best MMBM entry is at Phase Five — during the distribution phase, entering at any shallow retracement into the first FVG left behind by the displacement. These are lower-risk entries that capture a portion of the distribution move without the challenge of timing the exact reversal.
Study the MMBM on 30 historical daily charts of your primary instrument. For each bullish move you find, map the six phases and identify where the manipulation spike (Judas Swing) occurred. You will find a consistent pattern: the Judas Swing most often occurs during the Asian session or the early London session, and the true distribution (Phase Five) occurs during the London and New York sessions. This temporal pattern is the MMBM's greatest predictive feature.
Worked hypothetical example
A hypothetical MMBM study could mark a pre-session range, define what would count as a sweep below its low, and require a specified structure shift before a possible long entry. If price instead continues lower without meeting that condition, the record is 'no valid setup' rather than a failed long trade.
Failure case and what to test
The model's labels do not prove that a market maker accumulated or manipulated price. A story can be fitted to almost any completed range unless the phases and timing are defined in advance.
Test checklist
- Define accumulation range, sweep, confirmation and target objectively.
- Do not enter solely because a chart can be narrated as three phases.
- Track skipped setups and continuations that invalidate the hypothesis.
RELATED READING
Continue with guides selected for overlapping concepts and practical context.