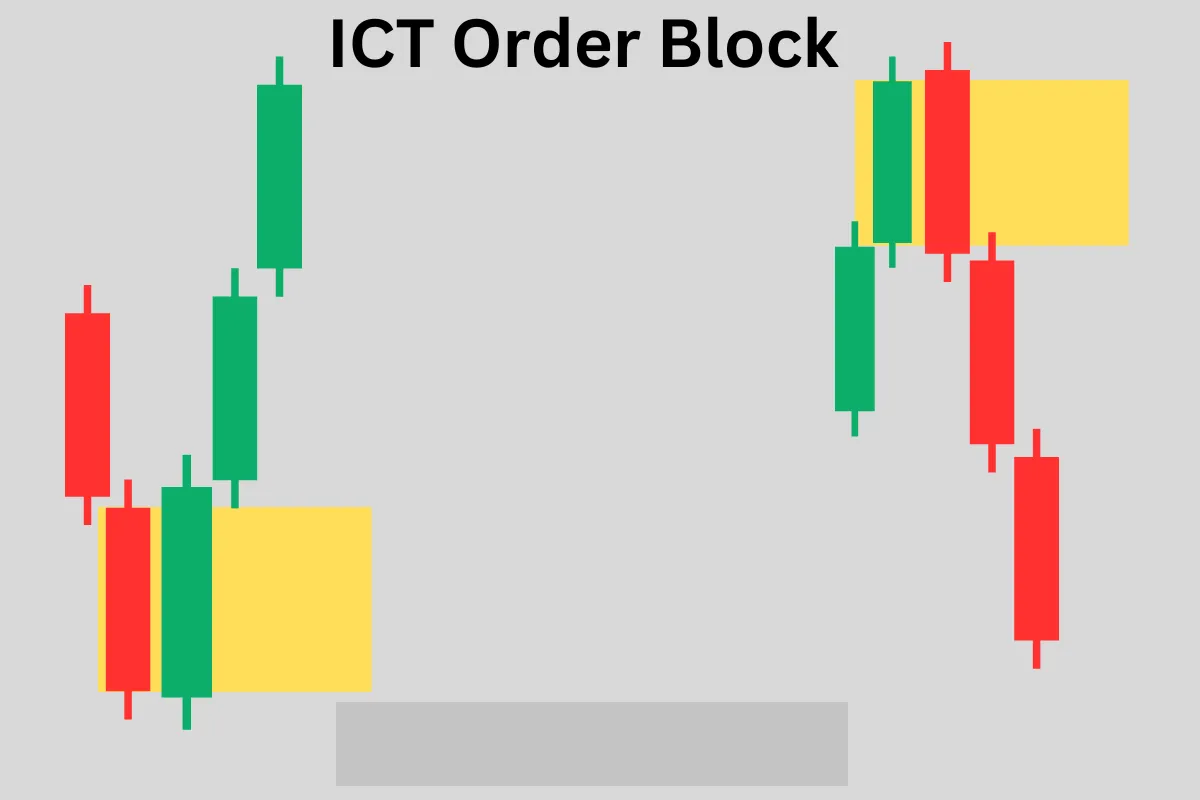
ICT Bearish Order Block — How to Identify and Trade It Precisely
The bearish Order Block is the last bullish candle before a bearish displacement. This guide explains exactly how to find it, confirm it, and trade it with the full ICT entry model.
Framework note: ICT terms are interpretations of price action, not proof of institutional motives or a market algorithm’s intent. No setup is guaranteed. Test clearly defined rules, account for costs and slippage, and use risk limits before risking capital. Read our editorial policy.
The ICT Bearish Order Block is one of the most commonly traded PD Array elements. It represents the last bullish candle — or last bullish candle sequence — before a bearish displacement move. This specific candle (or group of candles) marks the zone where institutional short orders were placed before the price was driven lower. When price returns to this zone, it encounters the same institutional selling interest — producing a bearish reaction that is the core of the Bearish OB trade.
Identifying the Bearish Order Block
The bearish OB identification rule: find the last bullish candle (or last sequence of bullish candles) immediately before a significant bearish displacement move. The bearish displacement is key — it must be a genuine institutional move: large-bodied bearish candles, minimal overlap, FVGs within the displacement sequence. If the move down was choppy and overlapping, the OB lacks institutional significance.
The bearish OB candle is the last candle that closed with a bullish body (close above open) before the bearish displacement began. Mark the high and low of this candle — this is the OB zone. The high of the OB candle is the top of the zone; the low is the bottom. The 50% midpoint of the OB candle's body (open to close, not high to low) is the CE — your primary entry level.
Confirmation Requirements for a Valid Bearish OB
- The OB candle must be the last bullish candle before the bearish displacement — not any random bullish candle.
- The bearish displacement following the OB must be genuine: large-bodied candles, FVGs within the sequence, clear directional momentum.
- The OB must be in the correct context: price should be in premium on the higher timeframe range (above the 50% equilibrium) for a bearish OB to have maximum significance.
- There should be buy-side liquidity ABOVE the bearish OB — equal highs, a swing high, or previous session high sitting above the OB zone. This BSL is what price may have swept before the OB formed.
- Higher timeframe alignment: the daily or 4-hour chart should show bearish institutional order flow for the bearish OB to be in the direction of the trend.
The Bearish OB Trade Entry Model
Entry: when price retraces back up into the bearish OB zone, switch to the 5-minute chart. Wait for a bearish displacement within the OB zone — a bearish MSS or a bearish FVG forming within the zone. Enter short at the CE of the 5-minute FVG (or at the CE of the OB if no FVG is available). Stop: above the high of the OB candle. Target: the nearest sell-side liquidity pool below (equal lows, previous session low, daily swing low).
Risk-to-reward depends on the chosen entry, invalidation and target; a 3:1 to 8:1 ratio should not be presented as standard without data. Record wins and losses, missed entries and transaction costs to assess the rule.
The single most important OB trade rule: never buy a bearish OB. A bearish OB is always traded as a short entry on the retracement. No matter how bullish the price action looks as it retraces into the bearish OB, the institutional context is bearish at that zone. The retracement into the OB is the delivery of price to the institutional sellers — it is the setup, not the direction.
Worked hypothetical example
For a hypothetical bearish-block rule, a trader marks the final bullish candle before a defined downward displacement and records its range before future bars appear. On a later return, the plan may require a rejection close and a lower-timeframe structure condition. If price crosses the chosen invalidation boundary, the setup failed by the written rule even if it later falls.
Failure case and what to test
The candle does not reveal who sold there, and price may pass through the zone or never come back. A narrow stop can also be unrealistic after spread or slippage, while a wide stop can make planned risk too large.
Test checklist
- Use one rule for choosing the final opposing candle.
- Predefine invalidation and size the position from that risk.
- Track reactions, full traversal, no-retest and missed-entry outcomes.
RELATED READING
Continue with guides selected for overlapping concepts and practical context.